Perfect These 3 Yoga Poses to Master Inversions
When I first began doing yoga, I longed to master arm balances and inversions. In class, experienced Yogis all around me were easily popping up into the coolest looking poses… Side Crow and Firefly and Eight-Angle Pose!
I quickly discovered physical strength alone wasn’t nearly enough to do these poses as effortlessly or beautifully as they seemed to be doing them!
“Form first” is a training motto of mine — safety is paramount and form is a large part of staying safe and training effectively.
But form involves much more than that little 4-letter word let’s on — alignment, engagement, connection, focus, breath work as well as minute corrections and recalibrations unite in the symphony that is form.
Yoga is a great tool for developing form — like a mirror reflecting our strengths and weaknesses — we can use this insight to refine our form, on the mat and in life.
Inversions are a great way to test mental and physical boundaries. But like all yoga poses, inversions must be built upon a solid foundation. Learn the form cues step by step, build strength with practice, and cultivate mindfulness to know when to advance and when to back off.
When your foundation is in place you will experience a multitude of benefits that a little time spent upside down can provide to help you:
- Strengthen Arms, Shoulders, and Wrists
- Tone Belly and Spine
- Improve Balance
- Overcome Fear
- Gain a New Perspective
- Spark a Spirit of Play
- Get Curious about What Is Possible
Here are 3 Poses to Master so you can safely and confidently progress your inversions — plus you’ll enjoy the benefits already mentioned, even if you never advance to crazy arm balances like the Pose Dedicated to the Sage Koundinya I:
- Downward Facing Dog – this foundation pose is vital in many forms of yoga practice and has a slew of specific form cues for you to master!
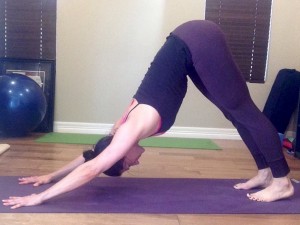
Form Cues:
- Begin on hands and knees with hands shoulder-width apart, wrist creases aligned with top of mat. Spread all 10 fingers wide. Evenly disperse energy into knuckle pads, then press deeply through the thumbs and forefingers of each hand.
- Activate your arms by magnetizing the thumbs toward each other, allowing the forearms to slightly roll in. Then engage the triceps (inner upper arm toward face) to counteract the internal rotation of the forearms. It sounds tricky but this subtle alignment creates a clear line of energy to protect both the wrists and the shoulders.
- Lift your knees from the mat with feet two fist-widths apart and parallel to each other. Press your hips back and allow your head and neck to follow the natural line of the spine. Keep the knees bent for now.
- Draw the shoulder blades down the back, creating space between the ears and shoulders.
- Lengthen your spine and hips back while reaching tailbone back and up. Firm your belly with navel to spine and ribcage closed in.
- Internally rotate your upper thighs back (just slightly to create space for the sit bones) to reach up and back.
- Try to straighten the legs without changing the shape or length of the spine. Allow heels to grow heavy.
- Dolphin – this is a simple, yet challenging posture that strengthens the shoulders, chest, and back while giving you the power to control how much weight your upper body can handle.
Form Cues:
- Begin on forearms and knees with hands shoulder-width apart, wrist creases aligned with top of mat and palms down.
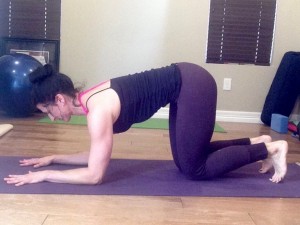
- Spread all 10 fingers wide. Evenly disperse energy into knuckle pads then press deeply through the thumbs and forefingers of each hand.
- Activate your arms by magnetizing the thumbs toward each other, allowing the forearms to slightly roll in. Then engage the triceps, hugging elbows toward each other. Feel the muscles of the chest turn on and contract.
- Draw the shoulder blades down the back, creating space between the ears and shoulders.
- Lift the knees from the mat and lengthen the spine and hips back like downward facing dog.
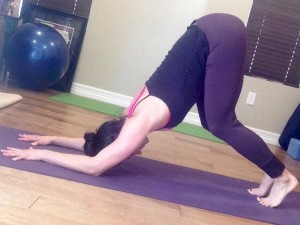
- Align the head and neck with the natural line of the spine. Press down into the elbows in order to lift shoulders away from the floor. Draw energy up the core, pressing navel to spine.
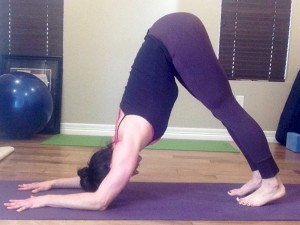
- Keep the spine lengthened and aligned as you work toward straightening the legs.
- Once legs are straight, without compromising form, begin to walk the feet in toward the elbows bringing more weight onto the upper body.
- Supported Shoulder Stand – this is a cooling posture, but is great for learning to align and balance your spine, pelvis, and legs while upside down.
Form Cues:
- Begin by stacking 2-3 folded blankets (with no wrinkles or creases) to support your shoulders. Place blankets about the length of your torso away from a supportive wall.
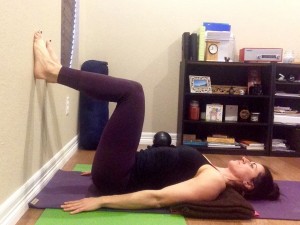
- Lie on your back with the top edge of your shoulders at the top edge of the blankets and your hips almost against the wall. Bend knees to 90 degrees so feet are flat against the wall.
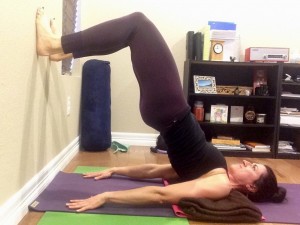
- Make sure to align your neck and soften your gaze toward your thighs or belly. DO NOT turn your head side to side in this posture.
- Extend arms down by sides. Press feet into the wall to lift hips. Bend elbows placing hands on lower back. Carefully shimmy your elbows in and shoulder blades down, away from ears as you press hands into lower back to lift torso higher.
- When you feel ready you may extend one leg at a time into the air while balancing on your shoulders and upper arms.
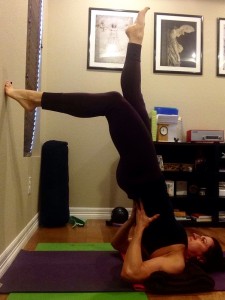
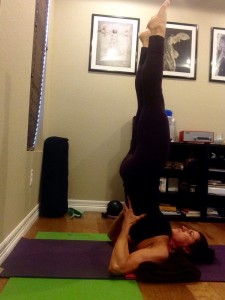
- Engage and internally rotate your thighs then tilt pelvis to bring tailbone toward heels and low belly in.
- Reach for the ceiling through your feet creating length and lift.
- Breathe deeply and stay for as long as you can.
The benefits of practicing inversions are vast. They promote blood circulation, calm the nerves by stimulating the parasympathetic nervous system, decrease depression and anxiety symptoms, ease fatigue, and improve immune function.
Inversions bring harmony to body and mind and can be a transformative component of any yoga practice.